How to play a Live Electronic Music Set as a solo producer!
Taking your songs from your studio on the stage!

If you are starting to think about performing your own electronic music live, this is for you. Being a music producer nowadays usually means writing almost everything on your own. You play with synths, drum machines, sequencers, etc. to create sounds and record them in your DAW to make tracks.
But taking your productions from your home studio to the stage can be a very tricky project and requires a ton of preparation and practicing. So, today we are trying to help you make your first steps on building your live set from zero. This is made for beginners that have no live playing experience but we think that many live musicians may benefit from this walkthrough!
Step 1 - DAW Preparation
The first thing you need to set up is your Live set project inside your DAW. And for DAW we mean Ableton Live.
Ableton Live was first made for Live gigs and DJs so its live features are unmatched compared to other DAWs. Here you’ll have all the tools you’ll need to create and manage your live set and feel safe on stage. But before you start working on your live set project you’ll need to go through the tracks you’ll want to perform and do some preparation on each one of them to set them up for your set.
Any song can have tons of parts and tracks but in order for it to be manageable you’ll need to group and create sections. A common group management for songs would be the following:
Drums | Percussion | Bass | Chords & Pads | Melodies | Vocals | Effects & Transitions | Miscellaneous
Of course, that is a simplified approach but in order to have a well-structured and easy-to-manage set you’ll have to simplify your arrangements and create Stems. This way, you’ll be able to go through each section of your tracks without getting lost in your session.
Important Decisions…
And also in this step, you’ll have to make a very important decision. Are you going to play an instrument (or more) live on stage or sing? If the answer is no then you can move on to step number 2. If yes, remember to remove the parts you’re going to perform live from your stems and leave room for you to play live!
For example, if you are planning to play the guitar and sing while playing your tracks, remove those tracks from your stems and keep only the sections you’ll need as backing tracks. You may want to sing the main parts but leave all the backing vocals you recorded. Or keep the chords of your guitar but leave room for melodies on top. Your choice. But this has to be decided beforehand so you can structure your Live set accordingly!
So now you’re ready to start building your live project inside Ableton Live. Here, we suggest that you set up your scenes to match the arrangement of your songs. Have a scene for the intro, verses, choruses, etc. so you can navigate through your song, but also have control of your set. This way you may want to change things up while playing. For example, have the chorus play two times instead of one, or extend the bridge of your song to create some tension.
Useful Tips!
We won’t go through the details of Ableton Live’s capabilities but the two most important tips are to set your scenes BPM so you can change the BPM of each track automatically as you change songs and have a click track.
For the BPM changes, you’ll just type the BPM followed by bpm in the scene’s name and Ableton will automatically change the tempo for you. Example - 120bpm. Simple as that.
To have a click track/ metronome playing just in your headphones or in-ear monitors and not through the speakers there are a few ways to do it. Assuming you won’t start playing in arenas where you’ll have sound-tech people settings things up for you, you will have to set this up yourself. The first thing you’ll definitely need is an audio interface with a second set of stereo outputs. Then you’ll go into Ableton and set up two Send Tracks, one for the speaker’s output and one for your headphones. Then, you set the output of those Send tracks, one goes into the main stereo output (speakers) and the second one into the second stereo output (in-ears). The third step is to set all your tracks to output sound into send tracks, not master and you’re done! This is the best way because you’ll then have full control of the mix you want to listen to in your in-ear monitors or headphones.
Step 2 - Gear
Now to the fun part. Let’s talk gear. To play live you will need instruments (optional), controllers, and utilities. So let’s go through each category and list our top picks!
MIDI Controllers
Other essentials are MIDI Controllers and/or Keyboards. Here, there are a lot of amazing options to serve all your needs.
A keyboard is definitely needed if you’re planning to play live some soft synths and the only thing you’ll need to have in mind is the portability factor. Are 32 keys enough or do you need more?
Then, you will want to control the scenes and loops you have inside Ableton Live without touching your laptop. The ability to launch scenes in Ableton is crucial and it would be nice if you could also control the levels of your tracks and of your send effects.

Novation Launchpad X
Probably the best controller to control your live sets in Ableton Live. You can launch scenes, mute/ solo tracks, and arm tracks for live playing. The RGB lights on the pads will make a huge difference when you’re playing in a dark club or stage. Color your tracks to your liking inside Ableton and you’ll have a visual guide of your set during your performance. You can do more things on the Launchpad, but for a live performance, we would suggest sticking to the session page to control your scenes and tracks on the fly. Definitely a must-have!

AKAI Professional APC 40 Mk2
Our second pick would definitely be the APC 40 by AKAI. Here you have way more hands-on control than on the Launchpad since you can also launch clips and scenes, but also control levels with the 9 faders and control effects and other parameters with the 16 rotary knobs. This is probably the best all-in-one solution for your live set. After you finish the MIDI mappings, you can do almost everything you’d want on a single piece of gear and that’s definitely an advantage. The only downside compared to the Launchpad X is that you can see only 5 scenes at a time so you’ll have to go up and down a lot, while on the Launchpad you can instantly see 8 scenes.
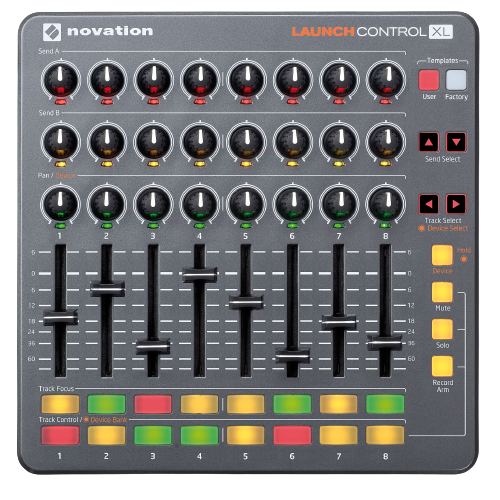
Novation Launch Control XL MK2
So, in case you prefer the Launchpad, its perfect companion would be the Launch Control XL Mk2. 8 faders and 24 knobs to map to your liking would be more than enough to control your set.

AKAI Professional midimix
An alternative to the Launch Control would be the AKAI midimix. Same architecture but with the much-needed addition of an extra channel to control your master bus volume.
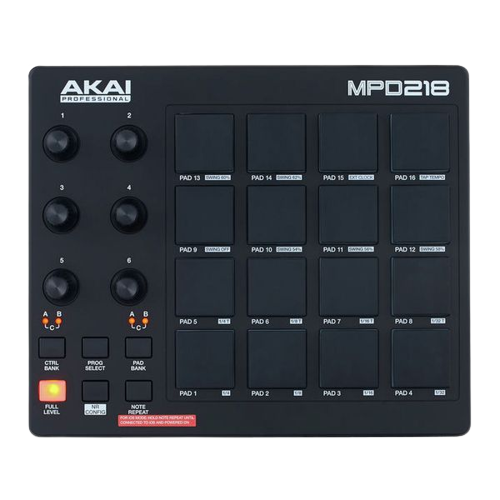
AKAI Professional MPD 218
And if you also plan to play some drums with MPC-style pads, the MPD 218 is the perfect solution. Super-cheap controller with MPC pads to finger drum with your drum racks. A great option to play some one-shot samples when you need them!
Utilities
As we stated above, you must have a laptop with Ableton Live and an audio interface with at least two sets of stereo outputs. Another thing to be careful about is how many instruments you’ll want to have on stage so you can calculate how many inputs you will need.
To simplify the process, we’ll suggest two types of interfaces, one with just two inputs where, for example, you can hook up a guitar and a mic, and one with four inputs in case you want to connect a couple of stereo synths or samplers.
Also, you will of course need headphones or in-ears to listen to your mix. We assume that you already have headphones but we’ll also include our favorite picks!
The instruments you’re going to use are completely up to you. Just consider you will have to carry them to the venue so bringing a massive & heavy Prophet 5 in an underground tiny club might not be a great idea…

Focusrite Scarlett 4i4 3rd Gen
A solid budget option that will not fail you. Focusrite interfaces are so famous for a good reason!

Universal Audio Volt 476
The new UA Volt series is fantastic! They look good and they sound even better. You have onboard monitoring options and big knobs to fine-tune them. Also, the vintage option is a great way to color your sound!

Arturia MiniFuse 4
Arturia’s brand-new series is a new contender for the best budget-friendly audio interface! Simple and effective!

SSL 2+
A legendary brand name on a budget. The new SSL audio interfaces are well-built and will last you for a long time. Having a Solid State Logic interface has never been easier!

Audio-Technica ATH-M50X
There’s a reason why one out of two producers have a pair of these. They sound amazing and are very comfortable to wear for hours.

beyerdynamic DT-770 Pro 250 Ohm
Another classic pair of headphones. Alongside the M50s, the DT-770 are one of the best budget headphones ever created!
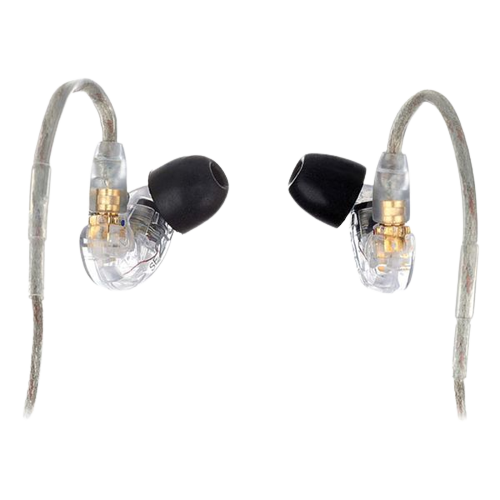
Shure SE215-CL
if you want to look like a pro performer, in-ear headphones are the way to go. Shure’s SE215 are beautful and will get the job done!

Sennheiser IE 100 Pro Black
Sennheiser are world-famous for making headphones for DJs, so having a pair of their in-ears will be the obvious choice for your live gigs!
Step 3 - Practice
Gear won’t make any difference if you don’t practice your craft. Performing a live set for the first time (or even for 100th time) can be a nerve-racking experience but at the same time it’s one of the most exciting things you can do!
So, practice your set as much as you can before going on set is crucial. This way, you may identify some parts that need to be fixed, get comfortable with your gear, and be more creative. You can even invite some friends over to test it out and get some feedback, that always helps.
A live set is never finished, and even after a few successful shows, you can change things up considering the vibes you get from your audience. Did a song kill the room’s energy? Was a part too repetitive? All those things and many more are hard to be recognized by yourself since you’ve listened to these songs a million times. Having some feedback, and closely observe your audience will help you get better everytime.
And a final pro tip: Don’t get wasted before going on stage.
Useful Videos